
In this tutorial, we'll explore how to send push notifications to a user's wallet whenever they receive a transaction containing tokens. It's a handy way to keep users informed about their account activity.
Note: This hypothetical example is not for real-world production use. We're simplifying things here for demonstration purposes, so there's no thorough error handling.
We'll be using OneSignal for sending push notifications, but you can also achieve similar functionality with other services like Firebase Cloud Messaging or AWS Pinpoint.
Now, let's dive into the details!
Step 1 - OneSignal Setup
The first step is to create a free account in OneSignal. For this example, we are going to use Web push but it works similarly for mobile.
To get started, the first step is to create a free account on OneSignal. Once you've signed up and logged in, we'll proceed to create a new OneSignal App.
For this example, we'll focus on using Web push notifications, but keep in mind that the process is quite similar for mobile apps.
Create a new OneSignal App and select Web. Once your app is created, you'll be provided with an App ID and API Key. Keep these credentials handy as we'll need them later to integrate OneSignal with our code.

Next, click on Configure Your Platform and select Web, select Code Custom, and set the site URL http://localhost:3000 and enable both toggles for local development.
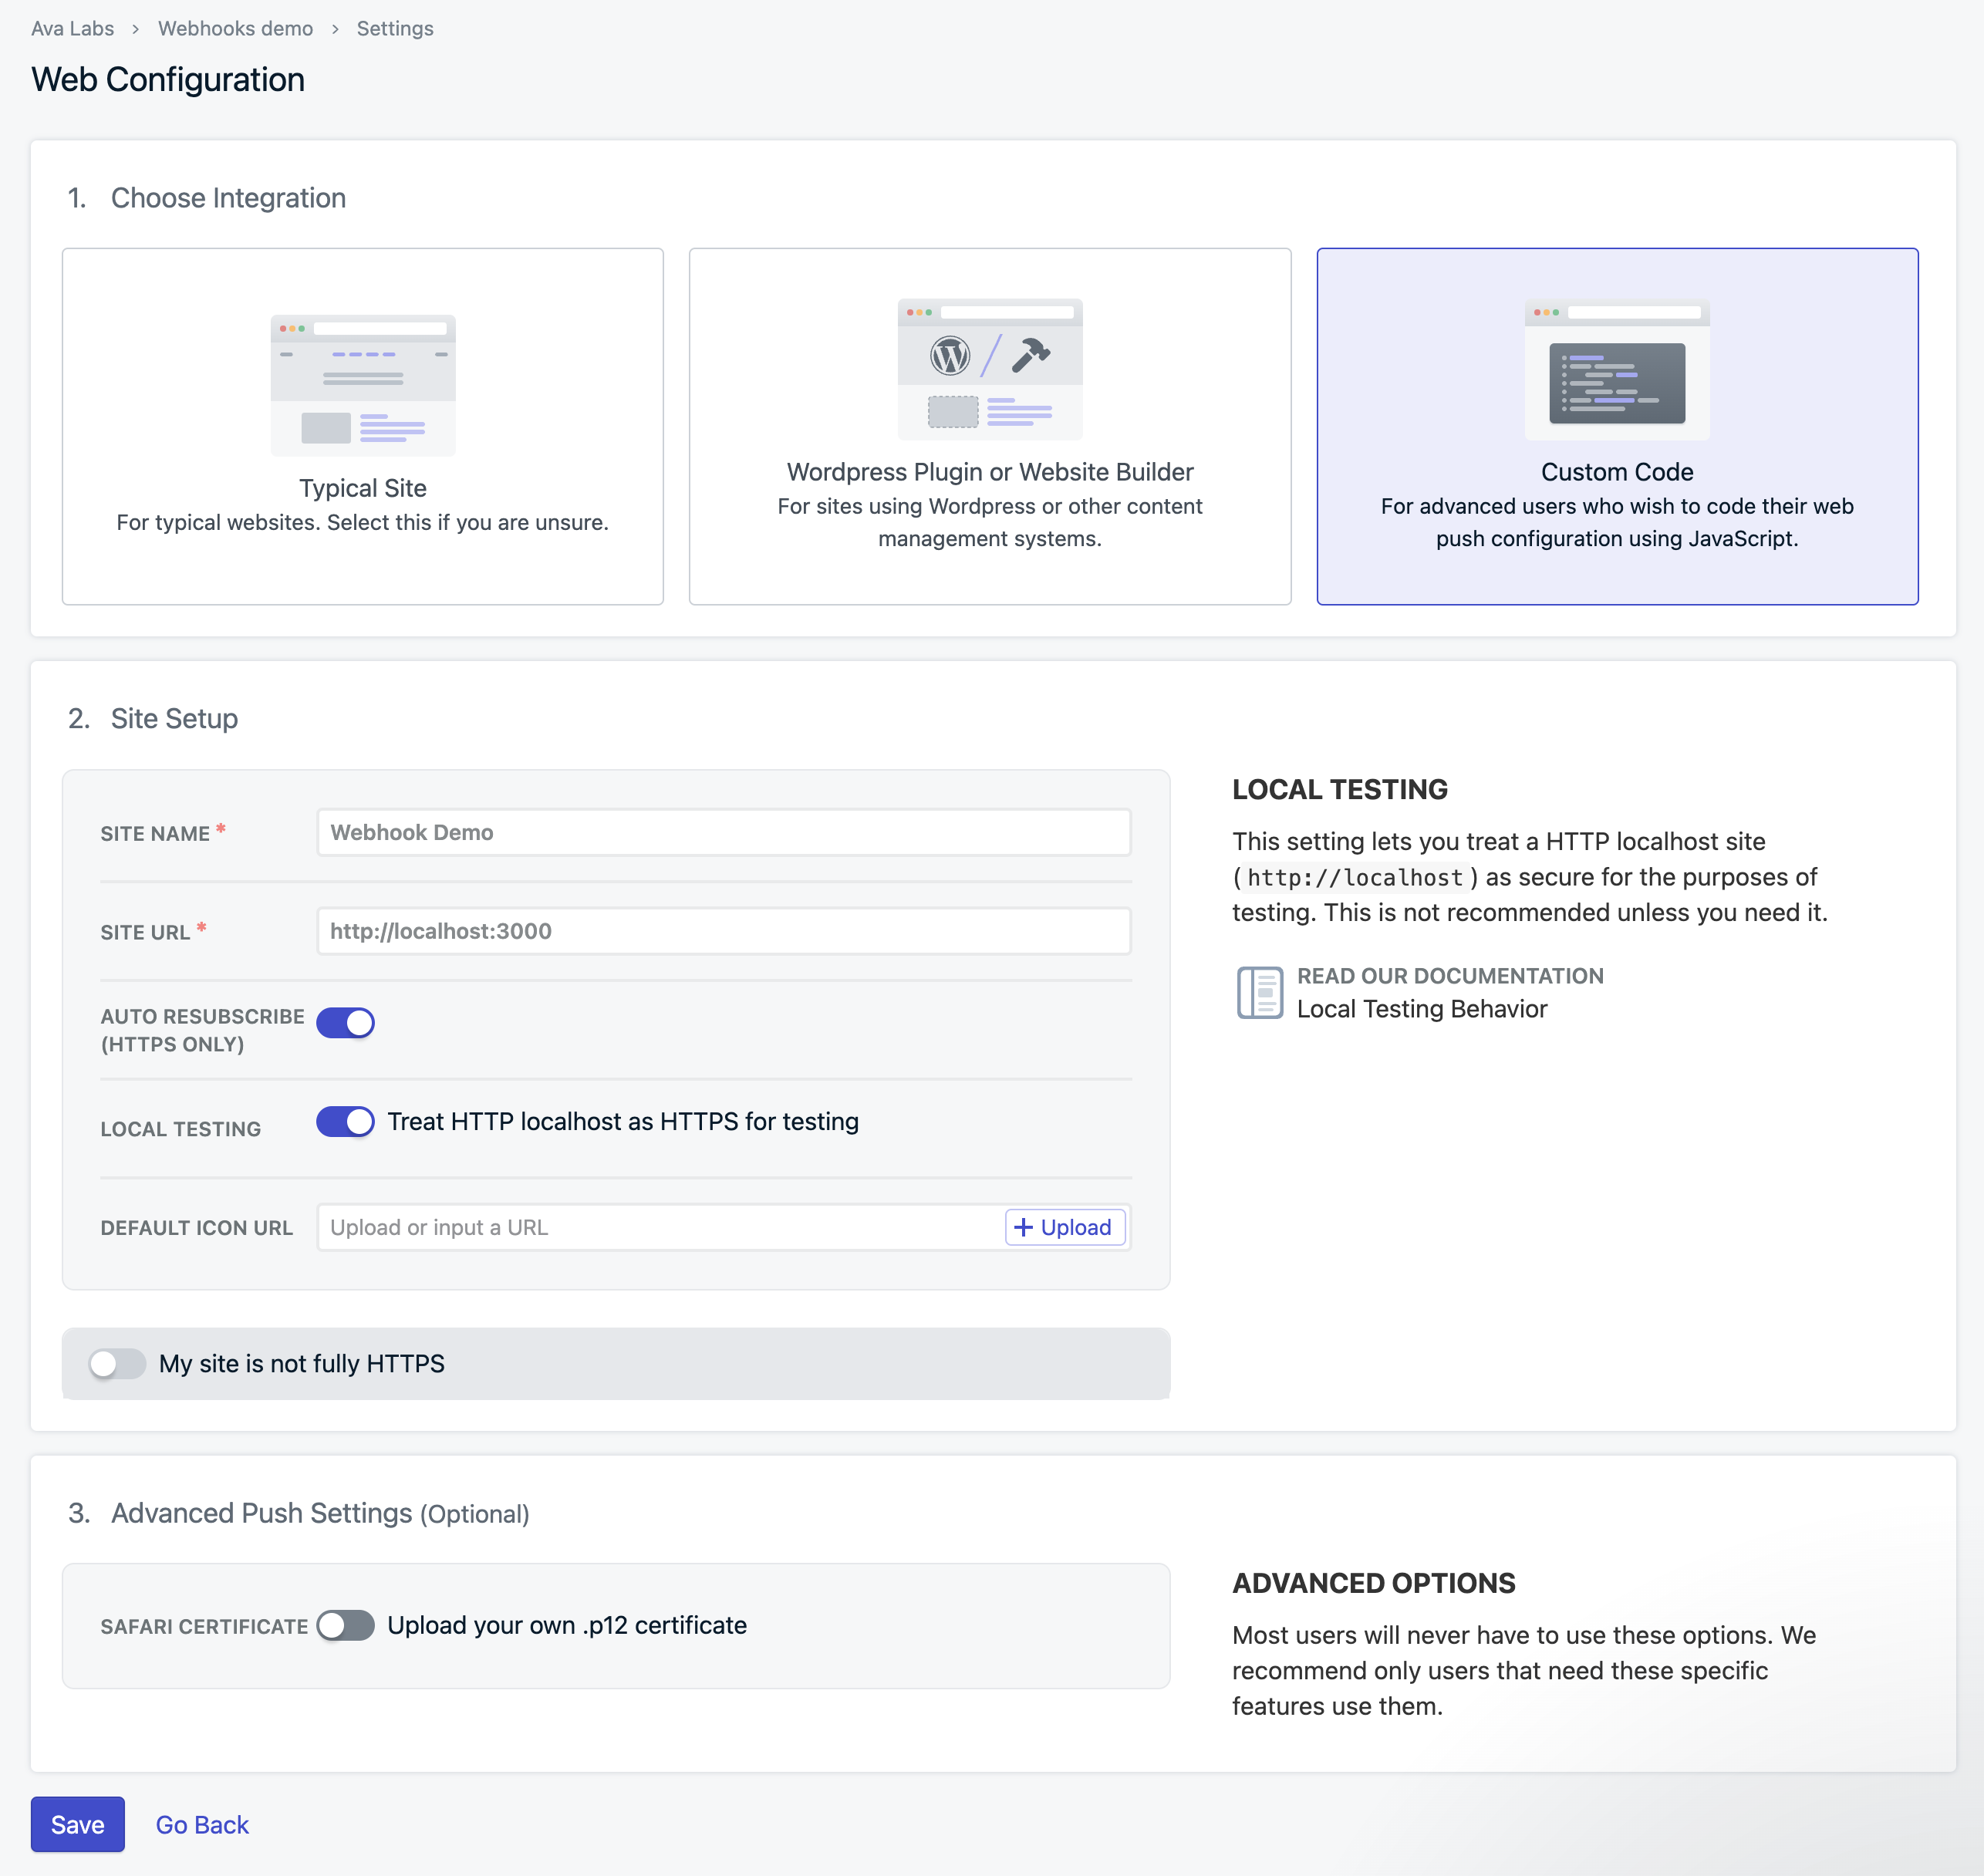
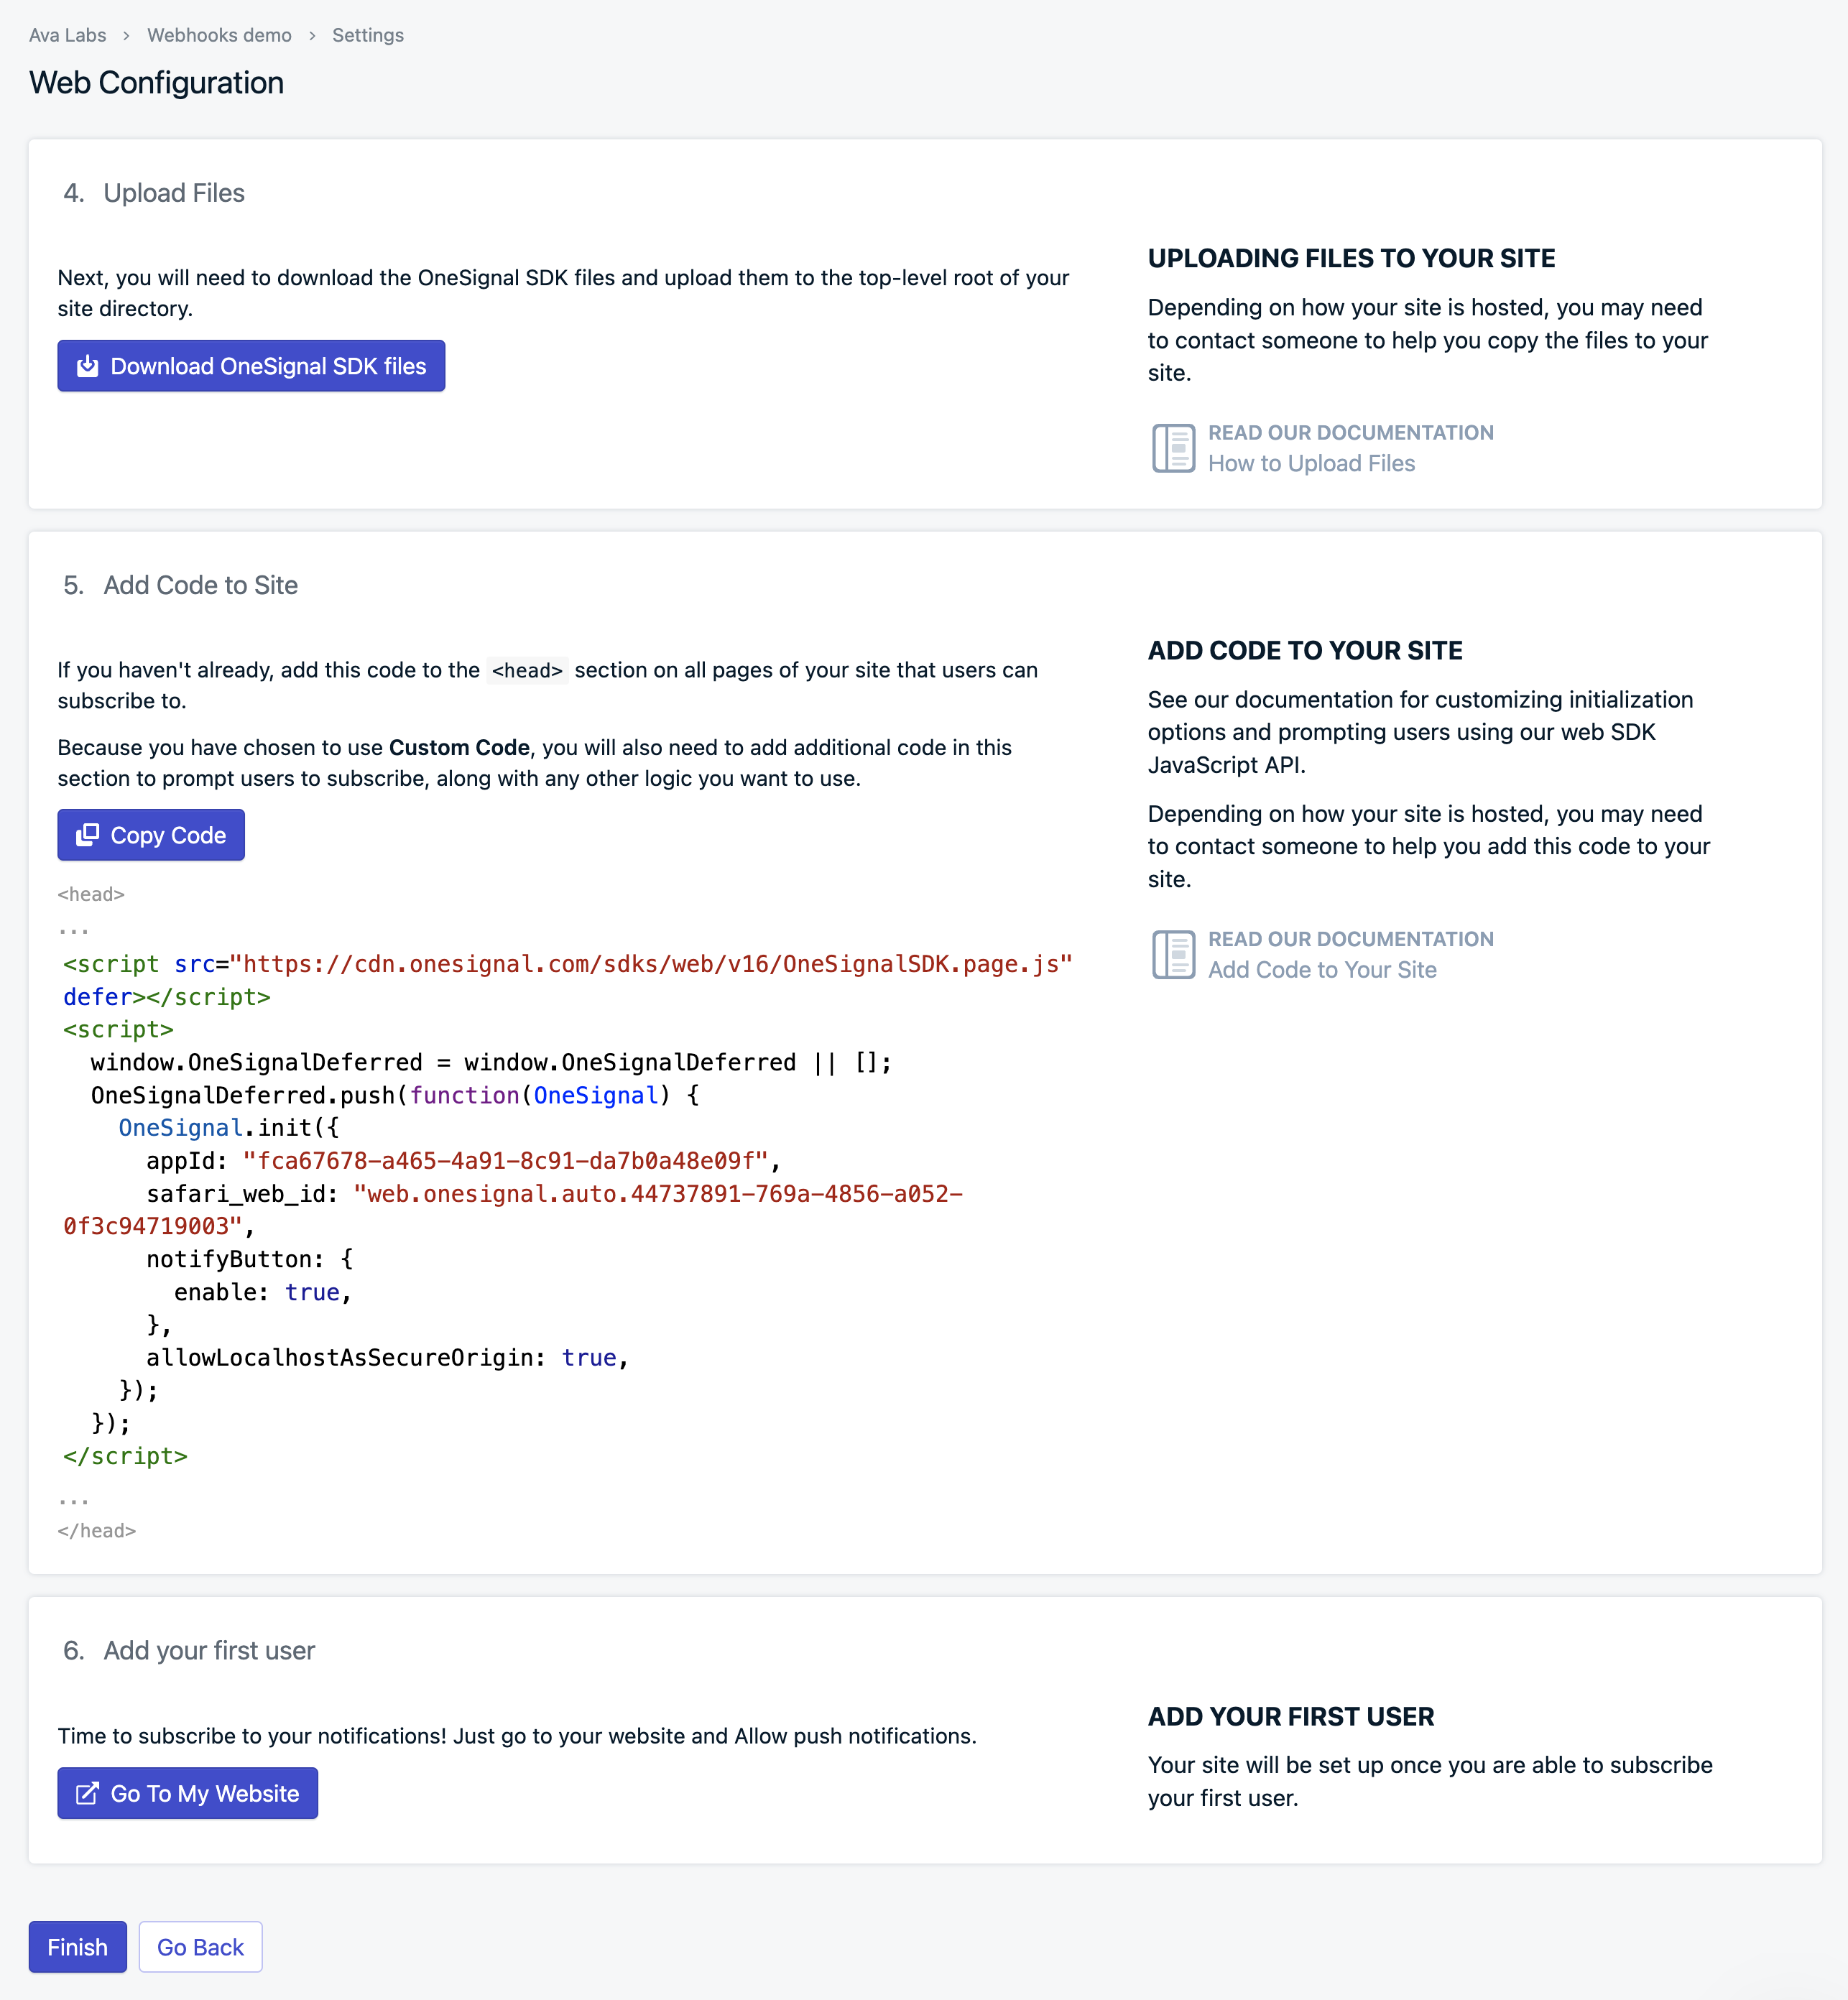
This will generate a code snippet to add to your code. Download the OneSignal SDK files and copy them to the top-level root of your directory.
Step 2 - Frontend Setup
In a real-world scenario, your architecture typically involves customers signing up for subscriptions within your Web or Mobile App. To ensure these notifications are sent out, your app needs to register with a push notification provider such as OneSignal.
To maintain privacy and security, we'll be using a hash of the wallet address as the externalID instead of directly sharing the addresses with OneSignal. This externalID will then be mapped to an address in our database. So, when our backend receives a webhook for a specific address, it can retrieve the corresponding externalID and send a push notification accordingly.

For the sake of simplicity in our demonstration, we'll present a basic scenario where our frontend app retrieves the wallet address and registers it with OneSignal. Additionally, we'll simulate a database using an array within the code. Download the sample code and you'll see client/inde.html with this content.
<html>
<head>
  <script src="https://cdn.jsdelivr.net/npm/web3@latest/dist/web3.min.js"></script>
  <script src="https://cdn.onesignal.com/sdks/web/v16/OneSignalSDK.page.js" defer></script>
  <script>
    window.OneSignalDeferred = window.OneSignalDeferred || [];
    OneSignalDeferred.push(function(OneSignal) {
      OneSignal.init({
        appId: "a63e0a25-186c-40a7-8fce-9c0fde324400",
        safari_web_id: "web.onesignal.auto.67fef31a-7360-4fd8-9645-1463ac233cef",
        notifyButton: {
          enable: false,
        },
        allowLocalhostAsSecureOrigin: true,
      });
    });

    window.connect = async function() {
      try {
        if (!window.ethereum) {
          throw new Error("Avalanche wallet not detected");
        }
        const accounts = await window.ethereum.request({ method: "eth_requestAccounts" });
        window.web3 = new Web3(window.ethereum);

        //Create externalID based on the address
        const externalID = web3.utils.sha3(accounts[0].toLowerCase()).slice(2);
        console.log("externalID:", externalID);

        OneSignal.login(externalID);
        OneSignal.Notifications.requestPermission();
      } catch (error) {
        console.error("Error connecting to Avalanche wallet:", error.message);
      }
    };
  </script>
</head>
<body>
  <h1>Avalanche push notifications</h1>
  <button onclick="window.connect()">Connect</button>
</body>
</html>
Run the project using Nodejs.
npm install express axios path body-parser dotenv
node app.js
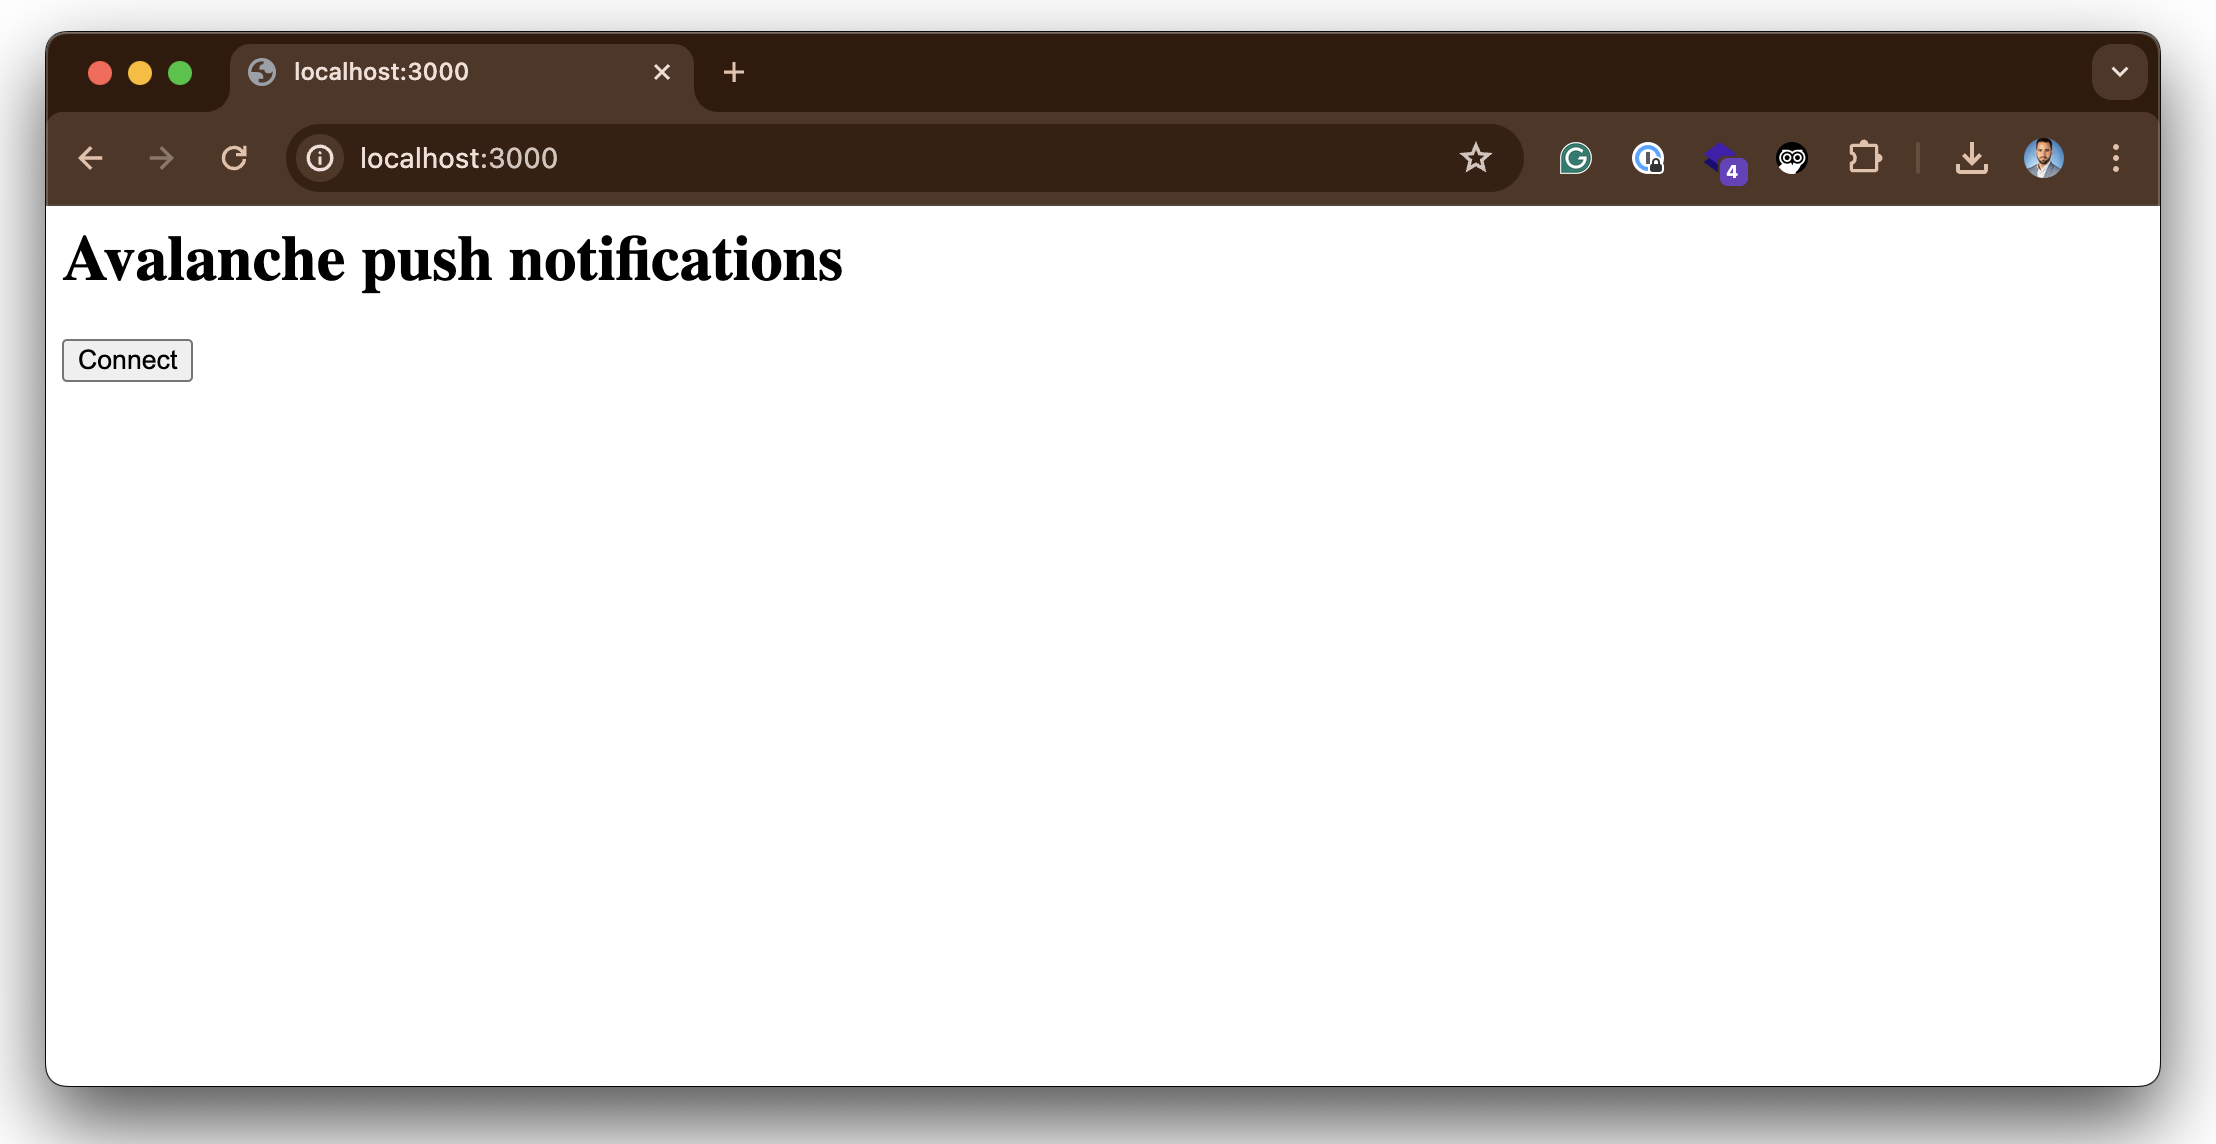
Open a Chrome tab and type http://localhost:3000, you should see something like this. Then click on Connect and accept receiving push notifications. If you are using MacOS, check in System Settings > Notifications that you have enabled notifications for the browser.
If everything runs correctly your browser should be registered in OneSignal. To check go to Audience > Subscriptions and verify that your browser is registered.

Step 3 - Backend Setup
Now, let's configure the backend to manage webhook events and dispatch notifications based on the incoming data. Here's the step-by-step process:
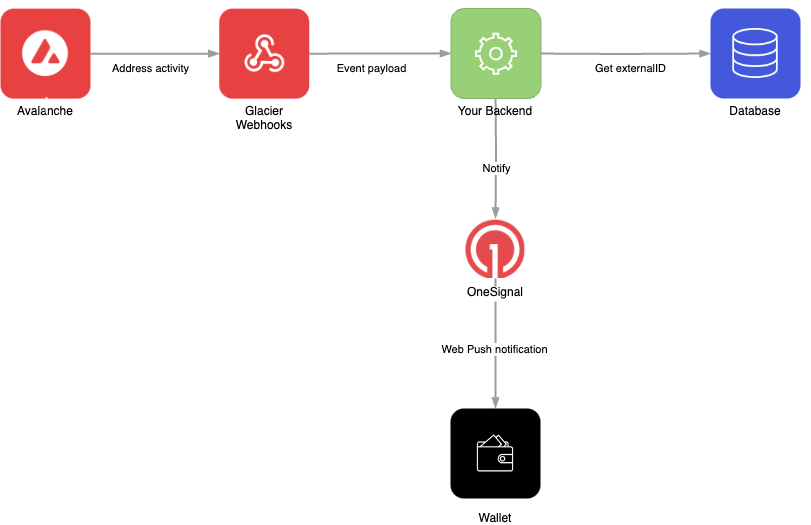
- Transaction Initiation: When someone starts a transaction with your wallet as the destination, Glacier webhooks detect the transaction and generate an event.
- Event Triggering: The backend receives the event triggered by the transaction, containing the destination address.
- ExternalID Retrieval: Using the received address, the backend retrieves the corresponding
externalIDassociated with that wallet. - Notification Dispatch: The final step involves sending a notification through OneSignal, utilizing the retrieved
externalID.
3.1 - Use Ngrok to tunnel the traffic to localhost
If we want to test the webhook in our computer and we are behind a proxy/NAT device or a firewall we need a tool like Ngrok. Glacier will trigger the webhook and make a POST to the Ngrok cloud, then the request is forwarded to your local Ngrok client who in turn forwards it to the Node.js app listening on port 3000.
Go to https://ngrok.com/ create a free account, download the binary, and connect to your account. Create a Node.js app with Express and paste the following code to receive the webhook:
To start an HTTP tunnel forwarding to your local port 3000 with Ngrok, run this next:
./ngrok http 3000
You should see something like this:
ngrok                                                                                                                                                                           (Ctrl+C to quit)

Take our ngrok in production survey! https://forms.gle/aXiBFWzEA36DudFn6

Session Status                online
Account                       [email protected] (Plan: Free)
Version                       3.8.0
Region                        United States (us)
Latency                       48ms
Web Interface                 http://127.0.0.1:4040
Forwarding                    https://c902-2600-1700-5220-11a0-813c-d5ac-d72c-f7fd.ngrok-free.app -> http://localhost:3000

Connections                   ttl     opn     rt1     rt5     p50     p90
                              33      0       0.00    0.00    5.02    5.05

HTTP Requests
-------------
3.2 - Create the webhook
The webhook can be created using the Avacloud portal or Glacier API. For convenience, we are going to use cURL. For that copy the forwarding URL generated by Ngrok and append the/callbackpath and our address.
curl --location 'https://glacier-api-dev.avax.network/v1/webhooks' \
--header 'x-glacier-api-key: <YOUR_API_KEY>' \
--header 'Content-Type: application/json' \
--data '{
    "url": " https://c902-2600-1700-5220-11a0-813c-d5ac-d72c-f7fd.ngrok-free.app/callback",
    "chainId": "43113",
    "eventType": "address_activity",
    "includeInternalTxs": true,
    "includeLogs": true,
    "metadata": {
        "addresses": ["0x8ae323046633A07FB162043f28Cea39FFc23B50A"]
    },
    "name": "My wallet",
    "description": "My wallet"
}'
Note: Don't forget to add your API Key. If you don't have one go to the Avacloud dashboard and create a new one.
3.3 - The backend
To run the backend we need to add the environment variables in the root of your project. For that create an .env file with the following values:
PORT=3000
ONESIGNAL_API_KEY=<YOUR_ONESIGNAL_API_KEY>
APP_ID=<YOUR_ONESIGNAL_APP_ID>
Note: To get the APP ID from OneSignal go to Settings > Keys and IDs
Since we are simulating the connection to a database to retrieve the externalID, we need to add the wallet address and the OneSignal externalID to the myDB array.
//simulating a DB
const myDB = [
    { name: 'wallet1', address: '0x8ae323046633A07FB162043f28Cea39FFc23B50A', externalID: '9c96e91d40c7a44c763fb55960e12293afbcfaf6228860550b0c1cc09cd40ac3' },
    { name: 'wallet2', address: '0x1f83eC80D755A87B31553f670070bFD897c40CE0', externalID: '0xd39d39c99305c6df2446d5cc3d584dc1eb041d95ac8fb35d4246f1d2176bf330' }
];
The code handles a webhook event triggered when a wallet receives a transaction, performs a lookup in the simulated "database" using the receiving address to retrieve the corresponding OneSignal externalID, and then sends an instruction to OneSignal to dispatch a notification to the browser, with OneSignal ultimately delivering the web push notification to the browser.
require('dotenv').config();
const axios = require('axios');
const express = require('express');
const bodyParser = require('body-parser');
const path = require('path');

const app = express();
const port = process.env.PORT || 3000;

//  Serve static website
app.use(bodyParser.json());
app.use(express.static(path.join(__dirname, './client')));

//simulating a DB
const myDB = [
    { name: 'wallet1', address: '0x8ae323046633A07FB162043f28Cea39FFc23B50A', externalID: '9c96e91d40c7a44c763fb55960e12293afbcfaf6228860550b0c1cc09cd40ac3' },
    { name: 'wallet2', address: '0x1f83eC80D755A87B31553f670070bFD897c40CE0', externalID: '0xd39d39c99305c6df2446d5cc3d584dc1eb041d95ac8fb35d4246f1d2176bf330' }
];

app.post('/callback', async (req, res) => {
    const { body } = req;
    try {
        res.sendStatus(200);
        handleTransaction(body.event.transaction).catch(error => {
            console.error('Error processing transaction:', error);
        });
    } catch (error) {
        console.error('Error processing transaction:', error);
        res.status(500).json({ error: 'Internal server error' });
    }
});

// Handle transaction
async function handleTransaction(transaction) {
    console.log('*****Transaction:', transaction);
    const notifications = [];

    const erc20Transfers = transaction?.erc20Transfers || [];
    for (const transfer of erc20Transfers) {
        const externalID = await getExternalID(transfer.to);
        const { symbol, valueWithDecimals } = transfer.erc20Token;
        notifications.push({
            type: transfer.type,
            sender: transfer.from,
            receiver: transfer.to,
            amount: valueWithDecimals,
            token: symbol,
            externalID
        });
    }

    if (transaction?.networkToken) {
        const { tokenSymbol, valueWithDecimals } = transaction.networkToken;
        const externalID = await getExternalID(transaction.to);
        notifications.push({
            sender: transaction.from,
            receiver: transaction.to,
            amount: valueWithDecimals,
            token: tokenSymbol,
            externalID
        });
    }

    if (notifications.length > 0) {
        sendNotifications(notifications);
    }
}

//connect to DB and return externalID
async function getExternalID(address) {
    const entry = myDB.find(entry => entry.address.toLowerCase() === address.toLowerCase());
    return entry ? entry.externalID : null;
}

// Send notifications
async function sendNotifications(notifications) {
    for (const notification of notifications) {
        try {
            const data = {
                include_aliases: { external_id: [notification.externalID.toLowerCase()] },
                target_channel: 'push',
                isAnyWeb: true,
                contents: { en: `You've received ${notification.amount} ${notification.token}` },
                headings: { en: 'Core wallet' },
                name: 'Notification',
                app_id: process.env.APP_ID
            };
            console.log('data:', data);
            const response = await axios.post('https://onesignal.com/api/v1/notifications', data, {
                headers: {
                    Authorization: `Bearer ${process.env.ONESIGNAL_API_KEY}`,
                    'Content-Type': 'application/json'
                }
            });
            console.log('Notification sent:', response.data);
        } catch (error) {
            console.error('Error sending notification:', error);
            // Optionally, implement retry logic here
        }
    }
}

// Start the server
app.listen(port, () => {
    console.log(`App listening at http://localhost:${port}`);
});
You can now start your backend server by running:
node app.js
Send AVAX from another wallet to the wallet being monitored by the webhook and you should receive a notification with the amount of Avax received. You can try it with any other ERC20 token as well.

Conclusion
In this tutorial, we've set up a frontend to connect to the Core wallet and enable push notifications using OneSignal. We've also implemented a backend to handle webhook events and send notifications based on the received data. By integrating the frontend with the backend, users can receive real-time notifications for blockchain events.